See new movies and links to white papers about TITAN in the column on the right (of the ERDAS TITAN Blog). The movies show a lot of detail regarding what is to come in the August release of TITAN!
Tuesday, August 19, 2008
New Movies and Papers
Thursday, August 14, 2008
Four Seconds to Save the World (ERDAS TITAN 2009)
Join me on September 25 at 11 am or 8 pm EST to learn about exciting new features in ERDAS TITAN 2009!
Register here: Four Seconds to Save the World
ERDAS TITAN 2009 rapidly enables multitudes of stakeholders to publish and consume geospatial data and location-based content in one online, collaborative network. When every second counts, users can consume data from multiple public and private sources into a variety of virtual globe, internet and rich client applications. This webinar will highlight this timely, unique permission-based tool, illustrating support of additional services and interoperability with ERDAS IMAGINE®, ERDAS Image Web Server, ERDAS APOLLO and ArcGIS.
Monday, August 11, 2008
Using Shared TITAN Layers with ArcGIS Server
In an earlier post, it was mentioned that ERDAS TITAN could be used as a proxy to bypass the limitations of data ingestion within many geospatial applications. This tutorial will attempt to demonstrate this idea. For this tutorial I decided to share data from a TITAN Client on my workstation to the TITAN Client on my ArcGIS Server machine. I did this so I could go through the complete process of consuming published datasets as well as being able to pull the TITAN WMS URL for that data into ArcGIS server and serving it out as a web application. This process let me control all aspects of the data I published, but the process will work for any published layer in TITAN.
Why is this useful? Using TITAN to publish datasets as WMS and then consuming and ultimately publishing them into a web application with ArcGIS Server decentralizes the data. For example, the traditional method of creating a web application entailed pulling data from a central server or database. With the WMS layers being provided by any TITAN user, no data needs to be stored locally on the server itself. You can directly consume the WMS layers into ArcMap and publish the map document you create from them.
Additionally, the speed of sharing and publishing the data via TITAN relieves you of data transfer time and storage needs, since you are accessing the data from someone else’s TITAN instance. Since TITAN creates the WMS URL by default, you only have to copy the address rather than write a custom application or have an in-depth knowledge of the WMS specification.
The first caveat is that a TITAN Client must be running on the same computer/server that ArcGIS Server is installed. This is a “must” because TITAN serves out WMS layers through a localhost address, so trying to access the WMS that resides on a separate workstation from the server will not work.
To start, I loaded the data I wanted to share into TITAN on my workstation. Figure 1 shows the datasets that I published in the Geospatial Instant Messenger. I’m logged in with my personal username (i.e. see ‘jherr’ at the bottom of the IM) in this case and I’m accessing our NVision GeoHub. The data visible in this Instant Messenger screenshot are some county-wide layers we use in various projects. The original data format, as you can see, was a shapefile. The first layer is an accurate road network and the second layer holds building footprints from 2006, just following Hurricane Katrina.
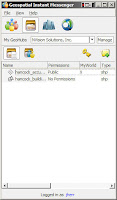 Figure 1 - Data loaded into TITAN
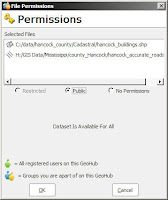 Figure 2 - Setting permissions for shared data
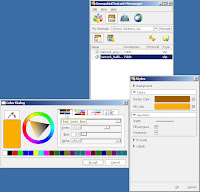 Figure 3 - Setting the styles of the layers
The first thing I did on the server install of TITAN is find the shares and get the WMS URL of each. You can do this by right-clicking on the shared layer and choosing “Copy WMS URL.” If you were to paste this link somewhere, you’d see that the address starts with http://127.0.0.1:8090. This is the reason TITAN needs to be on the ArcGIS Server machine, because the 127.0.0.1 is synonymous with “localhost” and cannot be accessed from a different computer.
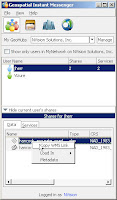 Figure 4 - Getting the WMS URL on the server TITAN
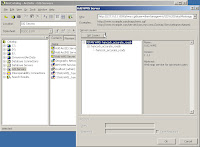 Figure 5 - Pull the WMS layer into ArcGIS
 Figure 6 - Use WMS in ArcMap Figure 6 - Use WMS in ArcMap |  Figure 7 - View WMS in ArcMap Figure 7 - View WMS in ArcMap |
Once you save the MXD with the WMS layers in it, you can publish it as an ArcGIS service. I published it through the ArcGIS Server Web Manager. For the resource type, choose “map” and browse to where you saved the MXD and give the service a meaningful name. Mine is titled “titan_wms_and_basemap.”
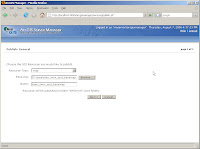 Figure 8 - Publish ArcGIS Service
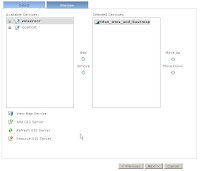 Figure 9 - Add map service to web application
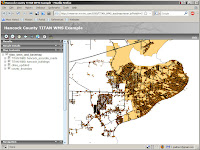 Figure 10 - Check out your web application
Since 2003, Joel Herr has worked for NVision Solutions, Inc., first as a GIS Analyst and currently as a GIS Specialist. He works heavily in analysis, training, production, and web application development.
NVision Solutions, Inc. is a small, disadvantaged, minority, woman-owned certified 8(a) firm specializing in advanced geospatial solutions and powerful web applications. NVision Solutions, Inc. has also assisted in several ERDAS TITAN installations and has selected it for use in emergency management and disaster recovery. NVision is headquartered at the Stennis Technology Park in Bay St. Louis, Mississippi. For more information about NVision Solutions, Inc., visit www.nvisionsolutions.com.
Friday, August 8, 2008
Query Apollo from TITAN
Just last month ERDAS announced ERDAS APOLLO 2009, a new generation Geospatial Business System that provides a robust SOA environment. Apollo finds, describes, manages and provides rapid delivery of unprecedented volumes of geospatial information to domain specific desktop and web client applications. Compliant with the Open Geospatial Consortium (OGC) and International Organization for Standardization (ISO), ERDAS APOLLO implements WMS, WCS, WFS, WFS-T and CS-W standards and the ECWP and JPIP wavelet streaming protocols.
And....with the upcoming release of TITAN 2009....TITAN users will now be enabled to query the ERDAS Apollo Image Manager (EAIM) and discover datasets published through OGC web service interfaces, directly from TITAN Clients. Support includes:
Query an EAIM catalog to retrieve layers exposed through a web serviceFor TITAN 2009 August release we have built support for authenticated WMS via custom code, where previously we were using GDAL for WMS support (we still use GDAL for support of many data formats). Support for authenticated WCS is planned as well as other varieties of web services through which Apollo exposes data.
Query metadata using keywords, spatial extent, and date and time
Support for authentication
Support for scale dependent security for WMS layers
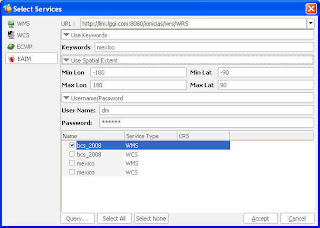
This also means that, along with all the other sources of data they manage in their TITAN Client, TITAN users can now discover and expose data from various EAIM servers in one simple, easy to use interface, and visualize that data in multitudes of applications.
EAIM Server URLs may be provided by GeoHubs or any TITAN user can paste in an EAIM URL, authenticate, query, discover and access data!
Coming soon: Map Collections!

Coming soon, GeoHub Admins will be able to create Map Collections - an assortment of web service layers - for use by their subscribers. Using Map Collections, GeoHub Admins can provide useful layers to all GeoHub subscribers at once. These layers can be accessed via TITAN Clients and subsequently loaded into various applications on the desktop. Even more exciting, TITAN users will be able to designate any shared service layer as the basemap for the TITAN Viewer! Check out the Countries layer in the TITAN Viewer from Demis.
You'll basically be able to turn any web service layer into the basemap. And if your layer is only a tile there is now a super low res basemap that will kick on so that you can still have a clue of where you are in the world. Our default basemap data is still provided by GlobeXplorer.
Map Collections may also be provided at the Network level, as well as sources of terrain. And, just like with basemaps, TITAN users can designate alternative sources of terrain for the TITAN Viewer.
Within an isolated Network running a Master Server and no connection to the Internet, these new features enable the Admin to use various sources of data and services to provide basemaps and terrain for an entire network.
Tuesday, August 5, 2008
Presentations Around the Globe
This August 2008, be sure to catch session presentations describing the role of ERDAS TITAN supporting data sharing in emergency management and disaster response initiatives.
These upcoming conferences may be near you!
Map Asia 2008 Kuala Lumpur, Malaysia, August 18-20
Map Africa 2008 Cape Town, South Africa, August 25-26


